¶ How to Set Up Your Tower Unite Condo Server
If you've just purchased a Tower Unite Condo Server from EVLBOX, this is your first stop! These steps will also work for most other hosting providers. If you're planning to host your condo on your own machine, we recommend following PixelTail’s official guide.
¶ Step-by-Step Setup Instructions
¶ Step 1: Create a Steam Game Server Login Token (GSLT)
Visit Steam Game Server Token Management
- Use App ID: 394690
- Add a short memo (e.g. "Tower Condo")
- Submit to get your GSLT
This token is tied to your Steam account. EVLBOX cannot provide this for you.

Save your token—you'll use it in Step 3.
¶ Step 2: Generate a Tower Unite Server Token
Visit Tower Unite Server Management and sign in via Steam.
- Click Add Server to generate your server token.
Copy the token for use in Step 3.
¶ Step 3: Apply Server Tokens in Nitro Panel
- Go to Nitro Control Panel
- Click your Tower Unite server
- Stop the server if it is running
- Go to the Startup tab
- Paste your:
- Steam Login Token (from Step 1)
- Tower Unite Login Token (from Step 2)
- Click Start to launch your server
¶ Step 4: Add an Admin Steam ID
To enable in-game admin tools, you need your Steam64 ID:
- Visit SteamID Finder
- Paste your Steam profile link
- Copy the SteamID64 (Dec) value
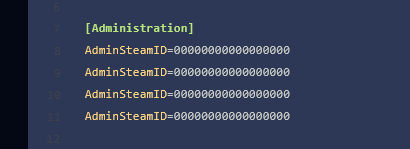
- In Nitro click Files and browse to Tower/Saved/Config/LinuxServer -- Click on TowerServer.ini
- Paste in your SteamID 64 (DEC) value from SteamID finder into the
AdminSteamID=section - (optional) If you want multiple admins just add multiple lines of
AdminSteamID=you can have as many as you like.
¶ Step 6: Launch and Access Your Condo
Once setup is complete, start your server. In-game, press Tab, then click the gear icon at the top right of the scoreboard labeled "My Condo" to access condo settings.
¶ Importing an Existing Condo from Single Player
If you've built a condo in single player and want to move it to your server, follow these steps:
¶ Export the Condo from Tower Unite
- Launch your condo in Tower Unite
- Open Saves > Export Condo from the scoreboard menu (Tab key)
- This saves a
.mapfile to:
Tower Unite/Workshop/Condo Exports/
¶ Upload to Your Server
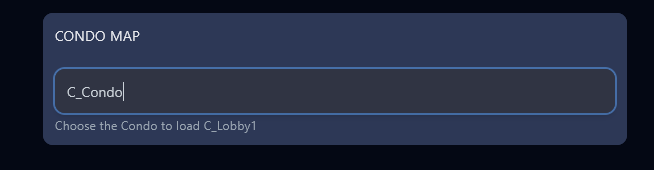
- Create a folder in your server files at:
Tower/Condos/C_Condo/(or the name of the map) - Upload the
.mapfile to this folder
Example path:
Tower/Condos/C_Condo/C_Condo.map
Make sure the file name and folder match the map name exactly.
¶ Set the Condo Map in Nitro
In the Startup tab of Nitro:
- Set Map Name to match the
.mapfile name (e.g.C_Condo, no extension)
¶ ✅ Your Condo Server is Ready!
You’re now hosting your own persistent condo online. Invite friends, show off your space, and enjoy your custom condo experience.
Want more? Check out our Tower Unite Condos Hub for more guides and support.